home aboutus etsyshop contact Image Map
Showing posts with label baking. Show all posts

Friday, July 25, 2014

Cookie Friday: Chocolate Chip Cookies

Now.  Before you get bored with the fact that we are just doing plain, ol' chocolate chip cookies today, let me tell you.  This is the best chocolate chip cookie recipe I have ever had.  These cookies are specifically asked for anytime I am needed to bring treats or a dessert to an event.  They are soft and chewy AND they stay that way even days after they've been made.

These are the cookies I grew up eating; my mom made them all the time, and I love them.  They are perfect all on their own and/or with a glass of milk.  But they are also perfect for making ice cream sandwiches with.  Just make them a little larger than normal, slap some ice cream between two of them and yumm-o!!

So, without further ado...here's the recipe for THE Best Chocolate Chip Cookies!


Chocolate Chip Cookies

1 1/3 c. butter (do NOT substitute margarine!)
1 c. sugar
1 c. brown sugar
2 eggs
2 tsp. vanilla
3 1/2 c. flour
1 tsp. baking soda
1 tsp. salt
12 oz chocolate chips

Preheat oven to 375.

Cream butter and sugars together; add eggs and vanilla.  
Mix in all of the dry ingredients and then gently stir in the chocolate chips.

Bake for approximately 8 minutes (the tops of your cookies should just barely be turning brown).  Remove from oven and let sit on cookie sheet for 5 minutes before moving to a cooling rack.


By the way?  This dough is perfect on its own, before being cooked.  
Just sayin' - in case you're a cookie dough sort of person.

Enjoy!

Monday, December 2, 2013

My Thanksgiving Fail

Happy December!  
How was everybody's holiday?  I hope everybody at too much food, enjoyed lots of family time and managed to sneak in a little R&R.

Since we didn't go anywhere for Thanksgiving this year, and we didn't have anybody at our house (first time that's happened since we've been married!), I decided that I would try a new dessert.

I've been wanting to try and pumpkin cake roll for years.  YEARS.  But for whatever reason, I decided to go with a red velvet cake roll instead.

It did not work out.

I mean.  It kind of resembled a cake roll.
Minus all the cracking.  And lack of cream in the middle.
Not pretty.


However, I learned a lot in this first attempt, and I have complete faith that the next try will go much better. Here's what I learned.

1.  Do NOT wear black when attempting a cake roll.  It over accentuates just how messy one really is in the kitchen.  In my case, it was really messy.

2.  Make sure that the recipe you are following (or blog found via Pinterest) has ALL pertinent information you may need for your baking adventure.  Turns out the tutorial I was following used a different jelly roll pan size than the one I was assuming she was using, which was probably my biggest problem.  A problem I didn't realize until after I had baked my first roll, saw there was an issue and then went back and carefully inspected her photos. It would have been super helpful if the tutorial she was giving would have mentioned her pan size.  But whatever.  Live and learn.

3.  The cream filling?  Quadruple that recipe amount if you want your cake roll to look as full and pretty as they do in the photos.  Mine clearly didn't have anywhere near enough.  It was definitely yummy, but it could have been yummier!

I think I'm better prepared for my next cake roll adventure.  Maybe for Christmas?  We'll see.  I will say that although it wasn't the prettiest, it did taste okay.  It definitely turned out better than my pumpkin pie from last year (when I totally forgot to put ANY sugar in it, and then served it to a house full of company...), but that's a story for another time.

What about you?  Any big Thanksgiving fails at your house this last week?

Friday, October 11, 2013

Cookie Friday: Scarecrow Cookies

Confession:  I hate making sugar cookies.
I feel like they're a 3 day long process.  One day to make the dough, one to roll and cut out and another to frost and decorate.  I'm much more of a drop and bake kind of gal.
So, when my son saw these adorable cookies on Pinterest, my heart sunk a little bit.  But.  It is scarecrow season, and it is close enough to a holiday to merit making sugar cookies, so I agreed.

Technically, there is supposed to be "hair" on that scarecrow, but it was just one too many steps for me.  He would be a cute Frosty for Christmas too, don't you think?

And, they're fun for little hands to design exactly how they wish!

Anyway.  You really could use any sugar cookie recipe to make these, or even get store bought cookie dough.  However, here is our favorite sugar cookie recipe:

Sour Cream Sugar Cookies

6 c. flour (save 1 c. for the end)
1 t. basking soda
1 t. baking powder
1 c. butter (room temperature)
2 c. sugar
3 eggs
1 t. vanilla
1 1/2 c. sour cream

Cream butter and sugar until light and fluffy (about 3 minutes).  Add eggs, vanilla and sour cream at low speed until combined.

Add dry ingredients at low speed just until combined.  Add remaining cup of flour as needed for correct consistency.  Roll out and cut into shapes as desired.  Bake at 425 for 7-8 minutes.


Friday, September 27, 2013

Cookie Friday: Nutella No Bakes

No new Cookie Friday today...my hubby's been out of town all week, 
and today we're off picking him up. YAY!! 

Daddy with all his little monkeys this summer

So, since we're busy celebrating having Daddy home, I am re-posting one of my favorite cookie recipes: Nutella No Bakes.

This recipe is my downfall.  I LOVE these cookies.  They're quick (we're talking 15 minutes!), easy and I always have all the ingredients in my cupboards.  So, unfortunately, anytime I'm craving a chocolaty sweet, these are my go to treat!


Nutella No Bakes

1/4 c. butter
4 T. cocoa
1/2 c. milk
2 c. sugar

In a saucepan, mix the first 4 ingredients and bring to a rapid boil.  Once it starts boiling, stir constantly and boil for 1 minute.

Immediately after your 1 minute is up, remove from heat and add:

1 tsp. vanilla
1/4 c. Nutella
1/4 c. peanut butter
2 c. oats

Mix well.  Drop by spoonfuls on wax paper (foil will work too).  Allow to cool and harden.

Friday, September 20, 2013

Cookie Friday: Butterscotch Krispies

I know these are nothing new (but, if you haven't managed to try these yet.  Be warned.  They are deliciously evil.  I may or may not have eaten an entire pan of these by myself.  On more than one occasion).  And technically, they're not even cookies.  But.  Kehlton asked to make these for Cookie Friday and there was no changing his mind.   Who I am try get in his way?


These are quick and simple to make.  And once you buy the ingredients to make one batch, you actually have enough to make two batches.  So when the first pan disappears too quickly, you have back up waiting.

You will need:

1 c. light corn syrup
1 c. sugar
1 c. peanut butter (chunky or creamy)
6-7 c. rice krispies cereal
1 c. chocolate chips
1 c. butterscotch chips

Combine sugar and syrup in large saucepan.  Cook over medium heat, stirring frequently, until mixture just begins to boil.  Remove from heat.  Stir in peanut butter and mix well.  Add rice krispies and stir until blended.  Press mixture into buttered 9x13 pan.

Melt chocolate and butterscotch chips together.  Stir until blended.  Spread evenly over rice krispie mixture.  Cool and then cut into bars.

A couple of notes?  I never put 6 cups of cereal in these just because I prefer them to be much gooier.  I usually only do 4-5 cups.  Also?  I never wait for them to cool.  In our house, the pan is usually half gone before they've cooled completely. They are equally delicious warm or cool.

Wednesday, September 18, 2013

Fall in Love With Fall: Pumpkin Spice Bars

Today I'm sharing one of my all time favorite pumpkin treats over at Hi! It's Jilly!

All month long she's hosting a "Fall in Love with Fall" series,
where different bloggers are sharing projects/recipes/ideas that they love for fall.
 Be sure to go check it out!


Pumpkin Spice Bars


Friday, September 13, 2013

Cookie Friday: Surprise Cookies

Kate Symmonds!!!
You won the jar of Triple Chip Cookie Mix from Mason Jar Mixes!
YAY!!!
Email me at kadydiddesigns(at)gmail.com to collect your yummy prize!


Alright.  So this week's version of Cookie Friday is a bit sloppy on my end.
Sorry.
 I totally forgot that I was planning on blogging about this until half way through,
and all I had handy was my cell phone to take photos.
So.  The photos are bleh.
My child is half naked,
and my counters are a mess.
But whatever.  That's my real life.
Doesn't everybody bake cookies in just their swim trunks?

This week we made Surprise Cookies (thanks to Martha Stewart), which I have pinned on my Cookie Monster board on Pinterest.
You can find the original recipe for these cookies HERE.
We followed everything as written, and the cookies turned out great.
Obviously.  Not my photo.  Martha Stewart's photo.  Again, the appropriate link...

Not only were they yummy, but they provided lots of helping opportunities for little hands.
These would be perfect for post-camping trip leftovers;
when you have half a bag of marshmallows left from making S'mores.
Or is that just our family?
Anyway.
Kehlton had a blast smooshing the marshmallows down on the cookies.

And he even helped make the frosting to go on top.
(The homemade frosting was delicious.
However, you could totally skip that step and just use store bought.
Sorry, Martha.)

Obviously, these were a huge hit!

If you decide to try these out, let me know how you liked them!

Friday, September 6, 2013

Cookie Friday: Mason Jar Mixes

Fridays around here have managed to turn themselves in to "Cookie Fridays".
My Kehlton doesn't have school on Fridays 
and he is so sad every Friday morning when his big brother goes off to school.
So...he and I have gotten into the routine of making cookies every Friday.  
(Not so good for my waist, but great for my mommy heart)

I decided that I would start sharing this tradition with you all too, 
in the form of new (and old!) cookie recipes and a photo or two.


Brittni, from Mason Jar Mixes, provided me one of their yummy cookie mixes for my son and I to try out.
We made the Triple Chip cookies.  

I seriously had a difficult time making myself open this adorable jar.

Kehlton and I had a blast baking 
along with a little help from sister, Jessa.


They were delicious!  And I loved how amazingly fragrant they were while they were baking in my oven.

Well.  As a fun surprise for the kick off of this new series, Brittni included a second jar of Triple Chip Cookie mix for me to share with you!  So, if you're interested in getting some fun mail that will turn into something delicious, simply follow the Rafflecopter prompts below.

I'll announce a winner next Friday over cookies!  :)

a Rafflecopter giveaway

Monday, July 15, 2013

Monster Cookies

Today, it was super cloudy and cool outside (and when I say cool, I mean it was 95 outside); 
perfect weather for making cookies with my boys.  

So, we made Monster Cookies.
This recipe makes a TON of cookies.  I'm only giving you the 1/2 batch recipe, and I still got over 65 cookies with the 1/2 batch.  And not 65 small, bite size cookies.  I'm talking 65 - big enough to impress my son - cookies.

My advice?
Make 1/2 batch.
Bake half of that.
Freeze the rest of the dough for another day.
Unless you just really want a lot of cookies; and I wouldn't blame you.


So here you go:  
Monster Cookies

Mix together in the order given:

3 eggs
1 1/4 c. brown sugar, packed
1 c. sugar
1/2 T. vanilla
1/2 T. corn syrup
1/2 c. margarine, softened
2 tsp. baking soda
1 1/2 c. peanut butter
4 1/2 c. oatmeal
1 1/2 c. M&Ms
1 c. semi-sweet chocolate chips

Drop by large teaspoonful on cookie sheet and flatten slightly with a fork.  Bake 10-12 minutes at 350.  Allow to cool almost completely before removing from cookie sheet and transferring to cooling rack (I learned this the hard way!  If you try to remove them from the cookie sheet too soon, they will crumble).

A word of advice?  Be sure to leave plenty of room for them on the cookie sheet.  They do grow quite a bit while in the oven.

I hope your kids enjoy them as much as mine!  Even my non-sweet eating child loves these!!

Monday, June 17, 2013

Today...

We are making "Thank You" treats for some friends and neighbors.


What are you doing today?

Saturday, March 2, 2013

Breakfast Cookies


On Instagram over the weekend, I posted this photo:

Healthy Breakfast Cookies.  
And, since I was asked by several to post the recipe, I figured this would be the easiest way to do it!
So, here you go!

Healthy Breakfast Cookies
(adapted from The Sneaky Chef)

First:
Make a flour mixture using equal parts all purpose flour, whole wheat flour and wheat germ.  I always do a minimum of a cup each, but I use this flour mix for lots of other things.  You only need 1.25 cups total for this recipe.

Then, puree (making as smooth as possible)
3 cups raw baby spinach leaves
1.5 cups of blueberries (fresh or frozen)
1/2 t. lemon juice and
1-2 T water 

I usually will double or triple this (especially when berries are on sale).  I then freeze it in 1/4 c. amounts.  One batch makes 1 cup.  You need 3/4 c. for the recipe.

Then combine in order:

1 1/4. c flour mixture
1/2 tsp baking soda
1/2 tsp. salt
1/4 c. unsweetened cocoa powder
1 tsp. cinnamon
6 T. brown sugar
1 tsp. vanilla
1 egg
3/4 c. puree mix from above
6 T. canola oil
Powdered Sugar for dusting
(I also like to add a handful of chocolate chips to the recipe.  It's not necessary, but helps my super picky eaters believe they really are eating chocolate chip cookies for breakfast)

You could also easily add a few tablespoons of protein powder to the mix as well.  I may have to try that next batch...

Once everything is mixed well, drop by spoonfuls on a greased or parchment paper lined cookie sheet.  Bake at 350 for 12-14 minutes.  Remove from pan and let cool on a rack.  Dust with powdered sugar and enjoy!  

I seriously let my children eat as many of these as they want.  I have one child who will willingly only eat peanut butter sandwiches with an occasional applesauce.  So for him, getting spinach AND blueberries in him is a BIG deal.

And word to the wise?  DO NOT EAT THE DOUGH.  It does not taste good.  Well, according to my husband anyway.  Once baked though, he scarfed down 2 or 3!  :)

What do you think?  How do you sneak healthy food into your super picky eaters?


Saturday, December 22, 2012

White Chocolate Walnut Fudge

I do not love white chocolate.  It's okay, and I'll nibble on it occasionally, but it's really not my favorite.  But, my husband loves it and requested that I make some white chocolate fudge this year.  So, I just used the trusty old Fantasy Fudge recipe on the back of the Marshmallow Creme jar and changed out the semi-sweet chocolate for the white chocolate.  It turned out GREAT.  I love this fudge!!  And I totally did not expect to.


So, in case you don't have a jar of Marshmallow Creme handy, here is the recipe for their fantasy fudge (with my changes to it):


White Chocolate Walnut Fudge
3 c. sugar
3/4 c. butter
5 oz. evaporated milk (1 small can)
12 squares of white chocolate (that's 2 full boxes), chopped
1 jar marshmallow creme
1 c. coarsely chopped walnuts (I would actually add probably another 1/2 c.)

Line a 9" pan with foil.  Bring sugar, butter and milk to a boil, stirring constantly.  Boil until it reaches a temperature of 234 F*.  Remove from heat.

Add chocolate and marshmallow creme, stir until melted.  Add walnuts.  Pour into pan and cool.

*The actual recipe says to boil for 4 minutes OR until it reaches 234 degrees.  Do NOT boil it a full 4 minutes!!  Be sure to use a candy thermometer to make sure your fudge turns out soft and creamy.

Monday, December 17, 2012

Holiday Baking: Double Chocolate Treasures

I love holiday baking.
Probably too much.
One of my favorite cookies to make each holiday season are these Double Chocolate Treasures.

They are delicious!!

Double Chocolate Treasures

2 c. chocolate chips
1/2 c. butter
3/4 c. sugar
2 eggs
1 t. vanilla
2 c. oatmeal
1 1/2 c. flour
2 t. baking powder
1/4 t. salt
1/2 c. powdered sugar

Melt 1 cup chocolate chips; stir until smooth and let cool slightly.

Beat butter and sugar until fluffy.  Blend in eggs, vanilla and melted chocolate chips.  Add all dry ingredients (except for powdered sugar).  Stir in remaining chocolate chips.

Roll into 1" balls, and roll in powdered sugar.  Bake at 350 for 10-12 minutes.
Makes 2 1/2 dozen.

Enjoy these, and in a couple of days I'll have another delicious holiday recipe for you! In the meantime, what are your favorite holiday treats??

Saturday, December 8, 2012

12 Days of Christmas Giveaway Day 12

DAY 12!!!

We made it! I'm not sure whether to be relieved or sad...
I sincerely hope you've had fun getting to know a few new shops.  
I know I did!  And I also had a blast sharing some of my favorite shops with you as well.

Before I get on with the giveaways for today, as promised, here are the links for all the previous days in our giveaway.  Just click on each number to take you to the giveaway for that specific day!


Now.  Because this is our last day, today's winner is in for a treat!  We have 3 different shops offering several prizes.  One lucky winner is going to be very, very happy!

Up first, we have Chris from Of UsualTees.
Chris makes some of the most amazing items out of recycled t-shirts.  We're talking garland, Christmas stockings, bracelets, yarn... SO COOL. 

She is giving away this handmade rug.  
It's 2'x3', and personally, I think it screams to be placed in a college dorm or apartment.
But really, it could go anywhere.  Doesn't it just look so soft and inviting?
"Please step on me and squish your toes in me..."

We also have Claudia from Snuggly Monkey, 
which is another super fun shop with many different items to offer.
Claudia is giving away an eye pillow (yes, please!) with a matching pocket mirror.
Adorable, aren't they?
Yet another perfect stocking stuffer (or two!).

And last, but definitely not least,
we have Brittney from The Sweeet Life.
Her shop is all about baking accessories.  
Sprinkles, dusting salts, sugars, party favors...the whole nine yards.

And get this.
She is giving away 6 different sets of cupcake toppers, which can all be seen below.
That is a total of 132 cupcake toppers.
Who's ready to throw a party?  Or maybe 6?
So.Much.Fun.
There you go!!  How's that for a nice, fun haul?
You have until midnight to enter all the giveaways, and then I will announce the winners on Sunday.
Be sure to check back to see if you've won!!!

I seriously hope you guys had fun!
I hope if you're a small business owner that you'll join us next year in the fun.
And more than anything, I hope you'll support all of the 24+ shops that participated in our giveaway, OR any other small business this holiday season.  

Best wishes and Happy Holidays!

Wednesday, October 3, 2012

Pumpkin Spice Bars

I feel like the biggest slacker on this blog lately, but my sweet little miss is really trying to drag out these last few days of pregnancy.  So to make myself feel a little less guilty, I whipped up one of my all time favorite fall baked goods to share with all of you today!  I wanted to blog about these last year, but for whatever reason, never got around to it.


Pumpkin Spice Bars


Preheat oven to 350.  Line a 11x15" pan with foil.

Mix together:

2 c. crushed graham crackers or gingersnap crumbs
7 T. melted butter
1/4 c. sugar

Spread mixture into baking pan and flatten/smooth out to make an even crust.
(**Side note: I have used 1 1/2 c. graham cracker crumbs, and it still works.  So if you have little hands at your house that steal graham crackers like I have at mine, you'll be fine.  Also.  7 tablespoons of butter is 1 tablespoon short of one stick, so I generally just use an entire stick of butter)

Bake for approximately 6 minutes; or until fragrant.  Cool completely.

Then, mix together:

2 c. flour
2 tsp. cinnamon
1 2/3 c. sugar
2 tsp. baking powder
1 tsp. baking soda
1 tsp. salt

Add:

4 eggs
1 can (15oz) pumpkin puree
1 c. vegetable oil

Pour on top of graham cracker crust and bake at 350 for 25-30 minutes.  Cool completely and frost with your favorite homemade OR store bought cream cheese frosting.  Feel free to sprinkle with any fall/Halloween sprinkles, or just leave plain.

These are delicious and perfect to take to any gathering this fall!!


Thursday, August 23, 2012

Killer Brownies


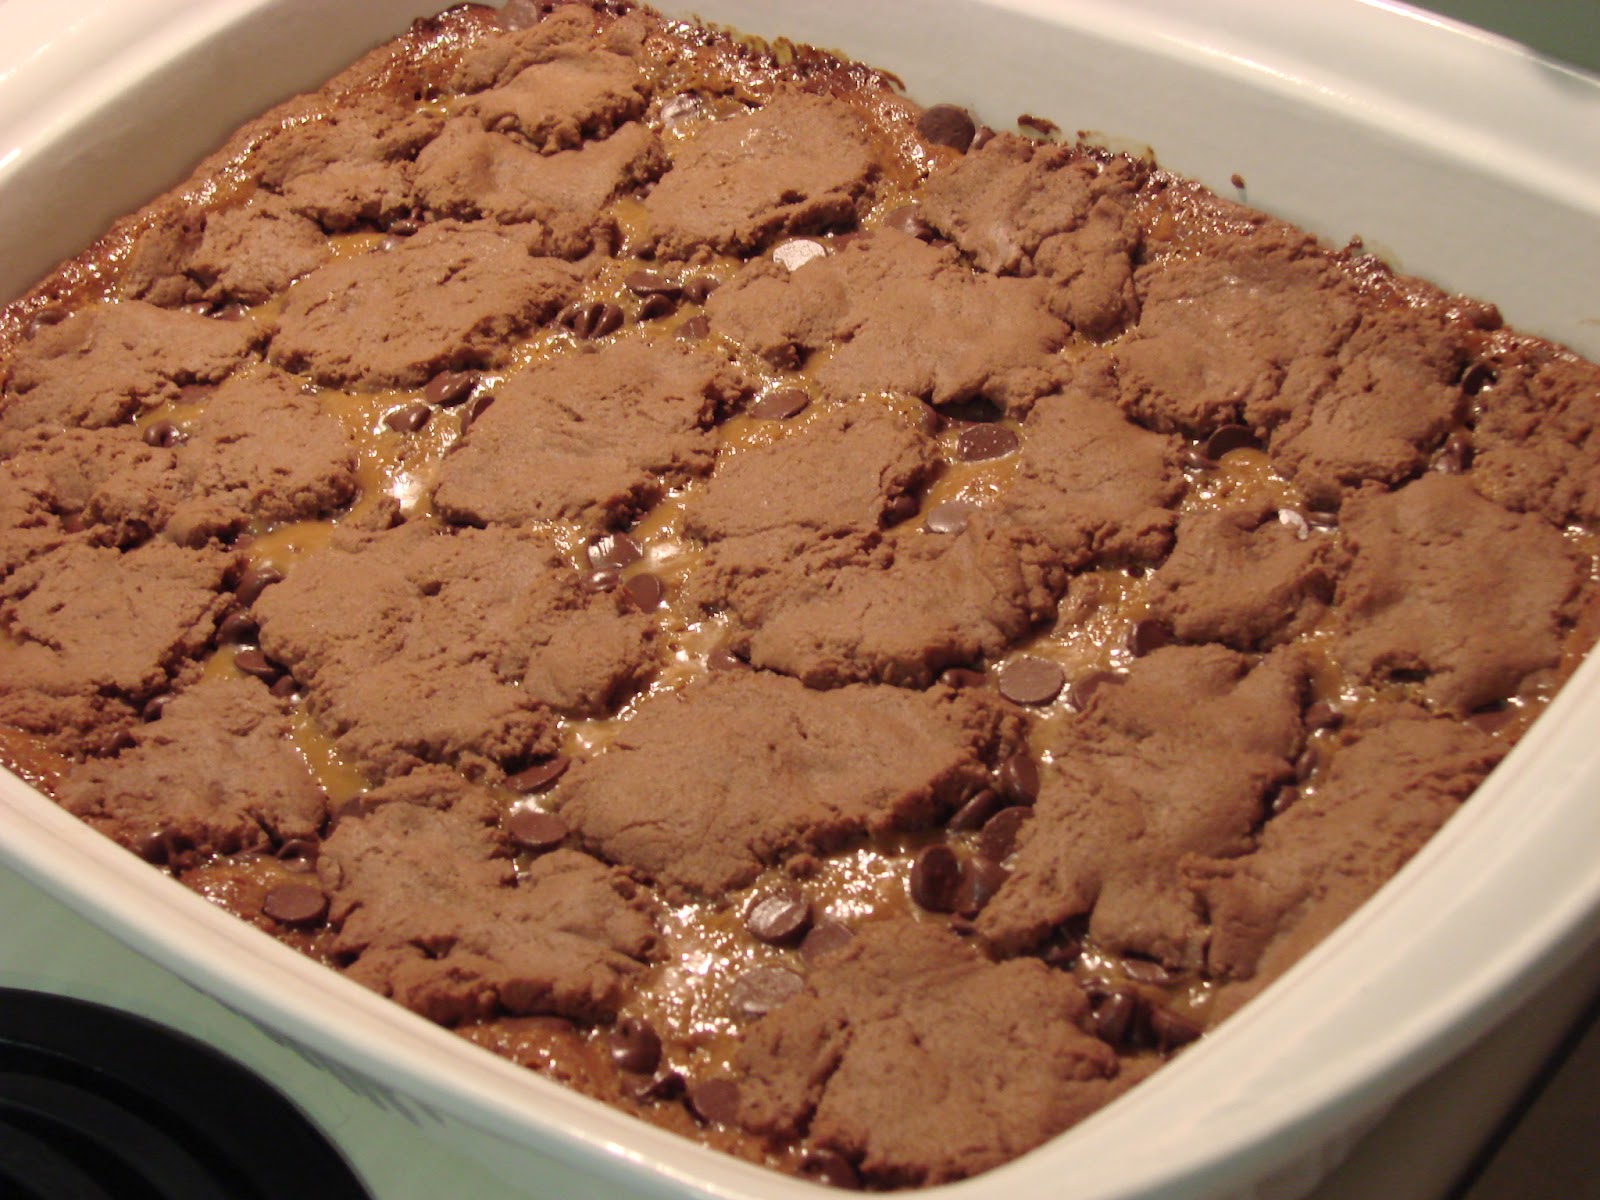
I'm not gonna lie. These are heavenly, and pictures don't do them justice.  Lots of gooey caramel with a sprinkling of melted chocolate...delish!  And super easy too.  Here's what you need:

1 cup Evaporated Milk
1 bag Kraft caramels
3/4 c. chocolate chips
1 German Chocolate Cake Mix
1/2 c. melted butter
1/3 c. flour

Melt caramels with 1/2 c. evaporated milk.

While those are melting, mix together the cake mix, flour, melted butter and other 1/2 c. of evaporated milk.  Take 1/2 of this brownie mix and pat it into the bottom of a greased, 9x13 pan.

Pour melted caramel on top of brownie layer.  Sprinkle chocolate chips on top of melted caramel.

Take remaining brownie mix and drop it on the top.  I like to just use my hands to place small pats of brownie mix on the top so it goes on more evenly.

Bake at 350 for 30-35 minutes.  Enjoy!!


Thursday, July 12, 2012

Whole Wheat Pumpkin Applesauce Muffins

I've been in the mood for autumn lately.  This happens to me every year mid-July.  Since "summer" around here starts in like, March; by the time July gets here I'm sick of it being 112 degrees outside everyday and I'm ready for crisp weather (which we still don't get around here, but whatever).  This said, I've been craving pumpkin and squash.  So today, I braved turning on my oven for a couple of hours while I made these muffins.  They are delicious and healthy and easy.  What more could you ask for?  I adapted my recipe from one I found on-line via Pinterest.

Whole Wheat Pumpkin Applesauce Muffins

2 c. whole wheat pastry flour                                   1/4 c. canola oil
1 tsp. baking powder                                               1/2 c. applesauce (I used half cinnamon & half regular)
1/4 tsp. baking soda                                                 1/3 c. buttermilk
2 tsp. pumpkin pie spice                                           2 eggs (egg substitute can be used!)
2/3 c. packed brown sugar                                       chocolate chips
1/3 c. sugar

Preheat oven to 400 degrees F.  Grease or line 12 muffin cups.

Mix all dry ingredients and then add all remaining ingredients.  Fold in chocolate chips (I just eye ball this...some days I want lots of chocolate, other days not so much, so do whatever looks good to you!).

Divide the batter evenly in muffin pans.  Bake for 15-20 minutes, or until tops spring back or a toothpick inserted into the middle comes out clean.

Okay.  So the official recipe says that this recipe only makes 12 muffins.  However.  I double this recipe and get 24 mini muffins and 30 regular muffins, so don't be surprised if you try it and get more than just 12 muffins!

And a note about the flour?  Don't worry about them coming out too heavy using all whole wheat if you use pastry flour.  I've never tried just regular whole wheat in this recipe, so I don't know how much of a difference that will make.  But, with the whole wheat pastry flour, they come out light.  I'm sure you could use regular flour or a mix of regular and whole wheat too if you wanted.

Tuesday, May 29, 2012

Dutch Oven Lemon Strawberry Cobbler

We spent Memorial Day weekend camping with a large group of friends.  Thanks to wildfires not too far from the area, we fully expected all fires to be banned.  However, we were not expecting charcoal to be banned; which was how we planned on preparing all of our meals.  Luckily our friends let us borrow their propane grills so we didn't have to starve!

So...since we were unable to enjoy all of our delicious camping food while camping, we came home and made one of our desserts.  Lemon Strawberry Cobbler.  I have to give full credit to my husband for this recipe; he started making it on one of our camping trips last year and it was a huge hit with everybody!
 It's super simple and absolutely delicious!  Here's what you'll need:

1 box of lemon cake mix
1 bottle of Sprite or 7-UP (18-20oz size)
I can of Strawberry Pie filling (it is also really yummy with Raspberry)

Dump your pie filling in the bottom of your dutch oven.  In a mixing bowl, mix the dry cake mix and Sprite together, and then pour on top of the strawberries.  Place in the oven for almost an hour (you'll want to start checking it at probably about 40 minutes).  If you wish, you can add a crumble top to it; just mix some oatmeal, brown sugar and flour together and sprinkle on top a few minutes before removing the cake from the oven.
One of the benefits of eating it at home is that you can top it with vanilla ice cream.  YUM!!  Obviously, since we made this at home, we just used our oven.  While camping, we use charcoal.  I will say that I do NOT do the cooking while camping; unless it's on a Coleman stove.  If you're interested in more detail on how to cook the cobbler using charcoal, just let me know and I will be more than happy to get those instructions from my sweet hubby!!

Linked up to: Uncommon, Delightful Order

Wednesday, April 4, 2012

Tips for Gooier Cinnamon Rolls

We love cinnamon rolls at my house.  Unfortunately, I only make them 3 or 4 times a year; if that!  However, we have been working on perfecting these rolls for awhile now, and I think this last batch has been the best by far.  When I asked my husband for improvements  for this round, he didn't have any for me!
Sorry for the sad cell phone photo.  I just happened to snap a photo right before I put them in the oven. When I made cinnamon rolls this weekend, I wasn't really planning on turning it into a blog post! :)

So.  Here's a few tips to get super gooey cinnamon rolls.

1.  Start with any basic roll recipe.  I go back and forth between a few different ones.  It doesn't really matter. just pick one that you like!
2.  Roll out your dough and spread softened butter on it.
3.  On top of that layer of butter, place additional pats of butter randomly across your dough.  I used 5 or 6 pats of butter for each set of dough I had to roll out (typically 2/recipe).
4.  Use brown sugar rather than granulated.  LOTS of brown sugar.  Seriously?  I don't think you need to worry about getting too much on there, and who eats these to be healthy anyway? ;)

That should provide you with yummy, bubbling deliciousness all around your rolls when you pull them out of the oven.  Obviously, the more butter and sugar you use, the more goo you'll get.
Enjoy! 


Tuesday, February 7, 2012

Raspberry White Chocolate Muffins

Wow.  It's been awhile since I've posted a recipe on here!  Sadly, there hasn't been much cooking or baking happening at my house lately.  This weekend, however, we took care of that!

Typically, I use blueberries in this recipe.  However, I decided to give raspberries a try and we loved it.  Maybe our new favorite.  There is a streusel topping you can add to the tops, but I just sprinkled a bit of sugar on the tops.  It's equally delicious either way.
 Add a tiny dab of butter in the middle right out of the oven...yummmm.

Raspberry White Chocolate Muffins

2 c. flour
1/2 c. granulated sugar
1/2 c. packed brown sugar
2 1/2 tsp baking powder
3/4 c. milk
1 egg, lightly beaten
1/4 c. butter or margarine, melted
1 1/2 c. white chocolate chips
1 1/2 c. fresh or frozen raspberries (or blueberries)

Combine flour, sugars, baking powder in large bowl. Add milk, egg and butter.  Fold in white chocolate chips and raspberries.

Spoon into prepared muffin cups (I fill mine almost completely to the top).

Bake for 22 minutes at 375.  Makes 18 muffins.

(If you want to add the streusel topping, add it right before it goes in the oven.  It's simply 1/3 c. sugar, 1/4 c. flour, 1/4 tsp. cinnamon with 3 Tbsp butter cut in until crumbly.   You can also drizzle the tops with melted white chocolate right out of the oven.)

Enjoy!!

LinkWithin

Related Posts Plugin for WordPress, Blogger...